RAID1 to single disk

Questions about SNMP, Power, System, Logs, disk, & RAID.
wknighta
New here
Posts: 3
Joined: Sat Jan 30, 2021 1:36 am

Re: RAID1 to single disk

Post by wknighta »

Hi, It is great work ! Thanks !
But unfortunately I have an issue during expansion.
GUI and command line show different sizes on my TS-332X.

It looks that there is a separate data base for GUI and it should be also updated to enable possibility to resize the volume.

Any idea how to fix it ?

[~] # mdadm --query --detail /dev/md1
/dev/md1:
Version : 1.0
Creation Time : Tue Dec 10 23:06:27 2019
Raid Level : raid1
Array Size : 14892500000 (14202.60 GiB 15249.92 GB)
Used Dev Size : 14892500000 (14202.60 GiB 15249.92 GB)
Raid Devices : 1
Total Devices : 1
Persistence : Superblock is persistent

Update Time : Fri Jan 29 19:25:20 2021
State : clean
Active Devices : 1
Working Devices : 1
Failed Devices : 0
Spare Devices : 0

Name : 1
UUID : xxxx:yyy:zzz:aaa
Events : 4650

Number Major Minor RaidDevice State
2 8 51 0 active sync /dev/sdd3
You do not have the required permissions to view the files attached to this post.
ganekogorta
Getting the hang of things
Posts: 50
Joined: Sat Nov 21, 2009 7:31 am
Location: Bizkaia

Re: RAID1 to single disk

Post by ganekogorta »

Hi wknighta

Have you tried to restart the nas?
It’s possible the GUI may not have been refreshed


Un saludo

Agur eta ondo ibilli

Mon (TS-469Pro, TVS-673, QBoat Sunny y TS-453Be)
wknighta
New here
Posts: 3
Joined: Sat Jan 30, 2021 1:36 am

Re: RAID1 to single disk

Post by wknighta »

Dear Ganekogorta,
ganekogorta wrote: Sat Jan 30, 2021 5:27 am Have you tried to restart the nas?
It’s possible the GUI may not have been refreshed Image
I tried twice. It doesn't help.

Regards
wknighta
New here
Posts: 3
Joined: Sat Jan 30, 2021 1:36 am

Re: RAID1 to single disk

Post by wknighta »

Hi all,
Magic command to fix the issue:
mdadm --grow /dev/md1 --size=max

There is no need to calculate the size. It seems that in my case it was wrong.
After the update of the size I got:

[~] # mdadm --detail /dev/md1
/dev/md1:
Version : 1.0
Creation Time : Tue Dec 10 23:06:27 2019
Raid Level : raid1
Array Size : 15615918972 (14892.50 GiB 15990.70 GB)
Used Dev Size : 15615918972 (14892.50 GiB 15990.70 GB)
Raid Devices : 1
Total Devices : 1
Persistence : Superblock is persistent
gui2.png
You do not have the required permissions to view the files attached to this post.
ganekogorta
Getting the hang of things
Posts: 50
Joined: Sat Nov 21, 2009 7:31 am
Location: Bizkaia

Re: RAID1 to single disk

Post by ganekogorta »

Hi
Thanks for your note


Un saludo

Agur eta ondo ibilli

Mon (TS-469Pro, TVS-673, QBoat Sunny y TS-453Be)
ja666
Know my way around
Posts: 186
Joined: Sat Nov 29, 2014 5:21 pm

Re: RAID1 to single disk

Post by ja666 »

wknighta wrote: Sun Jan 31, 2021 6:15 amMagic command to fix the issue:
mdadm --grow /dev/md1 --size=max
There is no need to calculate the size. It seems that in my case it was wrong.
Can you execute this command on a disk with data on it?
grouillier
Starting out
Posts: 36
Joined: Mon Apr 19, 2021 11:47 am

Re: RAID1 to single disk

Post by grouillier »

wknighta wrote: Sun Jan 31, 2021 6:15 am Hi all,
Magic command to fix the issue:
mdadm --grow /dev/md1 --size=max

There is no need to calculate the size.
Thank you for this. I migrated from a 750 GB disk to a 3 TB disk. After I finished successfully, I was still stuck with a 750 GB RAID size. I couldn't figure out how to expand either the volume or the RAID group using the GUI, but your command did the job. The system seemed a little slow after rebooting, but the QNAP is now optimizing - very slowly - so hopefully once it is done it'll speed up.
ja666 wrote: Mon Apr 05, 2021 11:12 pm Can you execute this command on a disk with data on it?
I just finished this process, and yes, you can resize without losing data.
ganekogorta wrote: Fri Nov 01, 2019 5:56 pm I run the following command by console to reduce the number of raid members to a single member. I get a single-disc Raid1
"mdadm --grow /dev/md1 --raid-devices-1 --force"
ganekogorta, thank you very much for writing this procedure. I used it successfully, and saved a lot of time. I found a couple corrections. In the above command, the third parameter should be

Code: Select all

--raid-devices=1
ganekogorta wrote: Fri Nov 01, 2019 5:56 pm I've removed the lines that begin with "scrubstatus, eventskipped, eventcompleted,degradedcnt".
I've removed the line that starts with "data_0", and the one that starts with "data_1" I've modified it to "data_0 = 1, disk_serial_number"
I removed the lines from the [Remove] field
I've changed chunkSize from 64 to value 0
I've changed readAhead from 4096 to value 0
I've changed databitmap from 3 to value 1
I'm using a TS-230, so my situation may be slightly different from yours. Unfortunately, I didn't have the raid.conf file from when I did my initial setup with the smaller drive. But I found raid.conf.bkup and raid.conf in /etc/config, and comparing the two, I set the following:

chunkSize 0 --> 512
readAhead 4096 --> 0
dataBitmap 3 --> 1

Both my backup and active raid.conf file had dataBitmap set to 3, but I followed your example and set it to 1. From what I'm able to find, the dataBitmap doesn't seem to make sense for a single disk.
TS-230, TS-253A, both with latest stable QTS
kibkib
Starting out
Posts: 19
Joined: Sun Oct 30, 2016 8:58 pm

Re: RAID1 to single disk

Post by kibkib »

I tried to follow the steps to replace the drive, but i do not have the file raid.conf on my nas.
It is TS-439 Pro II with QTS 4.2.6 20210327

[/etc/config] # cat raid.conf
cat: raid.conf: No such file or directory

I looked in other directories as well but the file is not there.
ganekogorta
Getting the hang of things
Posts: 50
Joined: Sat Nov 21, 2009 7:31 am
Location: Bizkaia

Re: RAID1 to single disk

Post by ganekogorta »

Hi

Uff, QTS 4.2.6 on a robust TS-439Pro II.
How old is it? 9 years?

I think that the organization system is diferent than the new QTS and we cannot apply the same instructions.

I'm going to test on an old ts219, but i think it runs QTS4.3.3


Un saludo

Agur eta ondo ibilli

Mon (TS-469Pro, TVS-673, QBoat Sunny y TS-453Be)
kibkib
Starting out
Posts: 19
Joined: Sun Oct 30, 2016 8:58 pm

Re: RAID1 to single disk

Post by kibkib »

ganekogorta wrote: Fri May 07, 2021 1:29 pm Hi

Uff, QTS 4.2.6 on a robust TS-439Pro II.
How old is it? 9 years?

I think that the organization system is diferent than the new QTS and we cannot apply the same instructions.

I'm going to test on an old ts219, but i think it runs QTS4.3.3 Image


Un saludo

Agur eta ondo ibilli

Mon (TS-469Pro, TVS-673, QBoat Sunny y TS-453Be)
There is no newer firmware for my device unfortunately.
It seems there is only the ".conf" file which contains HDD SN's.
During the start of the NAS, "raidtab" file and "md_brief.conf" file are created based on the drives superblocks by "/sbin/disk_reorder --patch" command.
I will confirm later, I am recreating the RAID1 again.
I already did it once, but the new drive was still reported as raid after the mdadm grow and not a single drive and also i was confused by fdisk not showing the partitions (it seems to be due to the 4TB drive wich is not supported by the fdisk version).

So I removed the raid by following commands and i am back at the beginning, trying again.
mdadm --stop /dev/md3
mdadm --remove /dev/md3
mdadm --zero-superblock /dev/sdb3

*****************
After the completion of RAID1 I ran following commands
/etc/init.d/services.sh stop
mdadm /dev/md0 --fail /dev/sdb3
mdadm /dev/md0 --remove /dev/sdb3

mdadm --grow /dev/md0 --force --raid-devices=1
mdadm --grow /dev/md0 --size=max
mdadm --stop /dev/md0
mdadm --remove /dev/md0
mdadm --zero-superblock /dev/sdd3

I changed the SN in ".conf" file and cleared the "raidtab" and "md_brief.conf" and edited the "smb.conf" as there was md0 mentioned instead of HDA.
After the reboot I was able to see my new drive working including the shares.
But the volume size was reported as the size of the previous drive.
The partition size was set correct but the filesystem occupied only half of it .

df
dumpe2fs -h /dev/sdb3

[~] # resize2fs /dev/sdb3
resize2fs 1.41.4 (27-Jan-2009)
resize2fs: Filesystem has unsupported feature(s) while trying to open /dev/sdb3
Couldn't find valid filesystem superblock.

Unfortunately there was an old version of resize2fs so i was not able to resize it on the nas . I had to remove the drive and do it from lubuntu.
Everything was correct when i put the drive back to the nas than.
maxknysna@gmail.com
New here
Posts: 2
Joined: Fri Jun 08, 2018 11:37 am

Re: RAID1 to single disk

Post by maxknysna@gmail.com »

Hi there....

I followed the instructions and everything worked a treat!

Now I want to reuse the original drive from bay 1 again in my unit but it keeps failing to create storage pool. Does anyone have an Idea why, i have read that people open a service ticket and support remove something to do with the superblock.

Thanks in advance
kibkib
Starting out
Posts: 19
Joined: Sun Oct 30, 2016 8:58 pm

Re: RAID1 to single disk

Post by kibkib »

maxknysna@gmail.com wrote: Mon May 24, 2021 4:12 pm Now I want to reuse the original drive from bay 1 again in my unit but it keeps failing to create storage pool. Does anyone have an Idea why, i have read that people open a service ticket and support remove something to do with the superblock.
You can just set the drive as global spare and unset again.

Or clear the superblock manually
mdadm --zero-superblock /dev/sdxx
JohnNap
Starting out
Posts: 22
Joined: Fri May 10, 2019 1:03 pm

Re: RAID1 to single disk

Post by JohnNap »

ganekogorta wrote: Fri Nov 01, 2019 5:56 pm Hi

I'll try to explain how to undo a raid 1 of TWO disks to ONE only.
It is even valid if it contains system volume. In fact this is the most interesting thing, especially for those who only have two bays in the QNAP.

This may be interesting for the following cases:
  • I have a disk with SMART crash warnings, I buy one same size, expand to RAID1 and remove it by removing the "touched" disk
  • I have a RAID1 and I want to undo it to reuse a disk because I need space or to mount it as a single drive.
We're going to need access to the console. I use WinSCP and Putty.
My Qnap is a TS469Pro with QTS 4.3.4

Just in case I recommend a data backup, as a failure can cost us to lose everything :!:
  • 1- We start from a single disk, create a raid1 and remove the old disk
This case is the easiest since we are going to take advantage of a file that we already have.
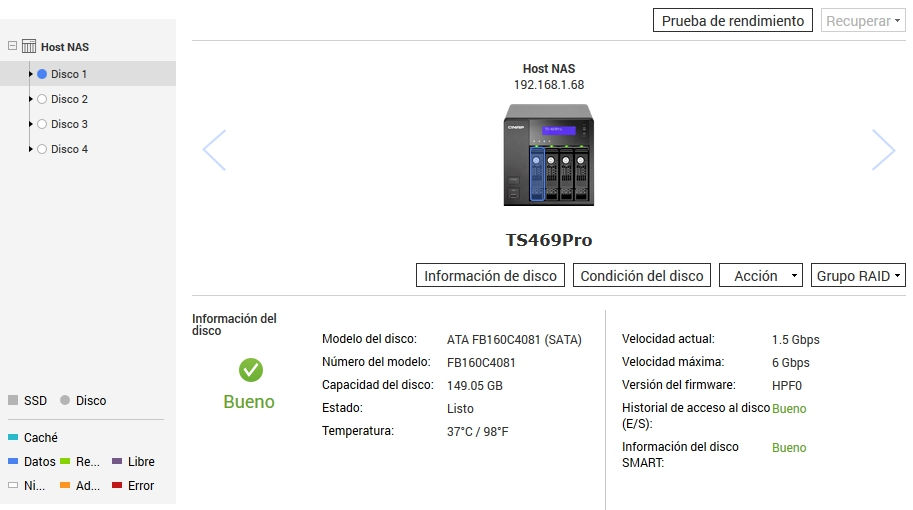
Initially I have a disk in bay1 (the first) as a simple disk. It's size is 160GB and it's serial number is 5RX0XIJN
Image

Image

Image

We examine and save the contents of the /etc/config/raid.conf file (which is actually located in /mnt/HDA_ROOT/.config/raid.conf)

Code: Select all

[Global]
raidBitmap = 0x2
pd_5RX0XIJN_Raid_Bitmap = 0x2

[RAID_1]
uuid = adcdd09b:1286b132:793faae3:09f1257a
id = 1
partNo = 3
aggreMember = no
readonly = no
legacy = no
version2 = yes
deviceName = /dev/md1
raidLevel = 1
internal = 1
mdBitmap = 0
chunkSize = 64
readAhead = 0
stripeCacheSize = 0
speedLimitMax = 0
speedLimitMin = 0
data_0 = 1, 5RX0XIJN
dataBitmap = 1
Raid1 construction

Now we physically add in the second bay the "new" 160GB disk and serial number 5RX0XHMS.
The nas will let us know that it has detected it by beeping and will prepare the disc.
Remember that if that disk has something it will erase it without asking (as long as they are not previous QNAP partitions).

Image

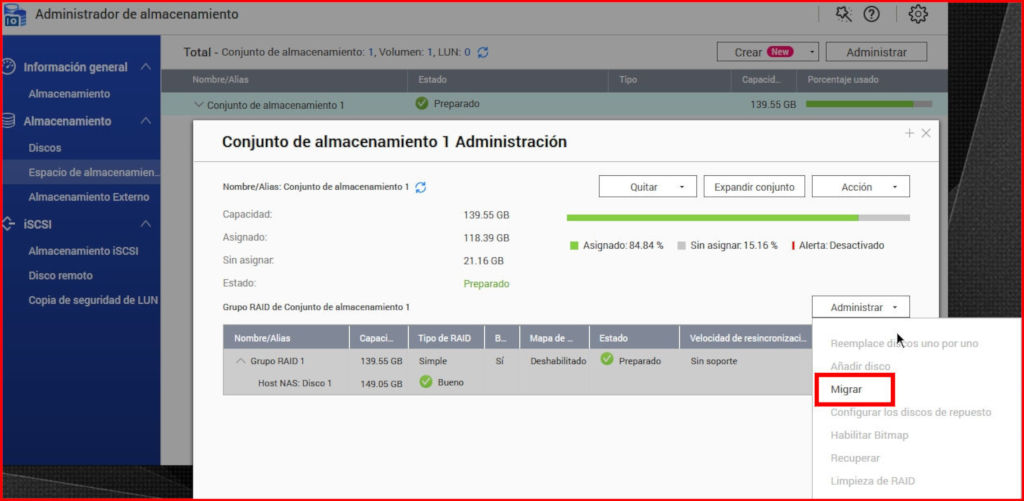
From the menus, migrate from single disk to RAID1

Image

Image

We finish the wizard and wait for both disks to be synchronized (be patience if you have large disks)
Image

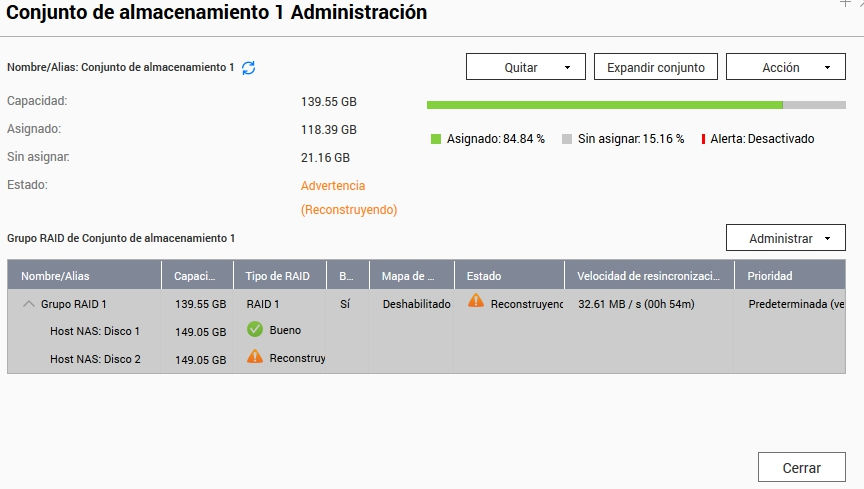
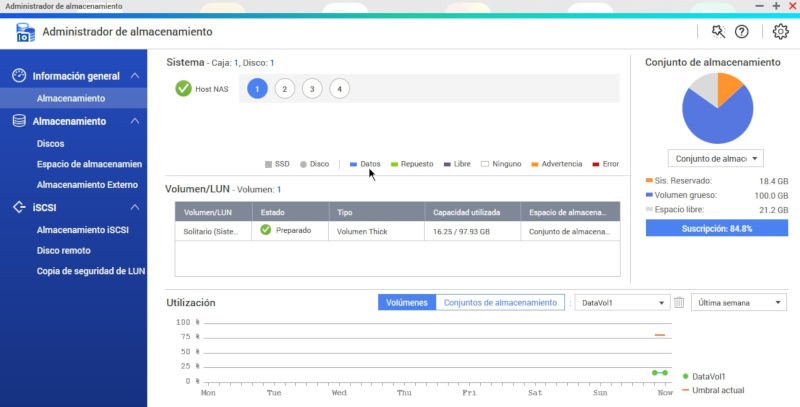
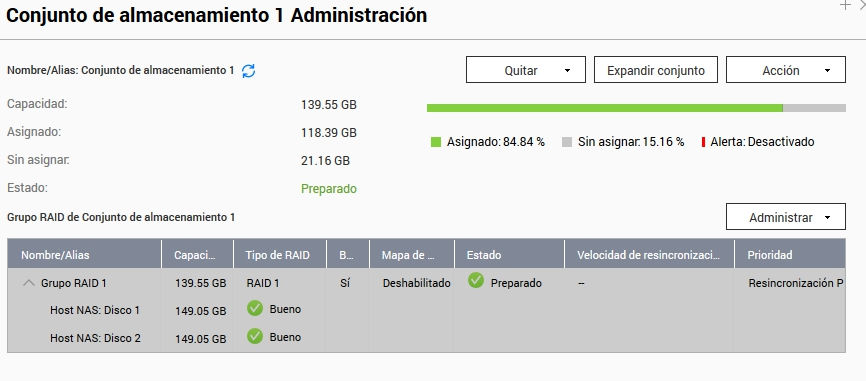
When it's finished we'll be with something similar to this
Image

Now again we get the contents of the new /etc/config/raid.conf file

Code: Select all

[Global]
raidBitmap = 0x2
pd_5RX0XIJN_Raid_Bitmap = 0x2
pd_5RX0XHMS_Raid_Bitmap = 0x2

[RAID_1]
uuid = adcdd09b:1286b132:793faae3:09f1257a
id = 1
partNo = 3
aggreMember = no
readonly = no
legacy = no
version2 = yes
deviceName = /dev/md1
raidLevel = 1
internal = 1
mdBitmap = 0
chunkSize = 0
readAhead = 4096
stripeCacheSize = 0
speedLimitMax = 0
speedLimitMin = 50000
data_0 = 1, 5RX0XIJN
data_1 = 2, 5RX0XHMS
dataBitmap = 3
scrubStatus = 1
eventSkipped = 0
eventCompleted = 1
degradedCnt = 0
These values have changed:
chunkSize = 0
readAhead = 4096
dataBitmap = 3

And these are the new lines:
pd_5RX0XHMS_Raid_Bitmap = 0x2
data_1 = 2, 5RX0XHMS
scrubStatus = 1
eventSkipped = 0
eventCompleted = 1
degradedCnt = 0

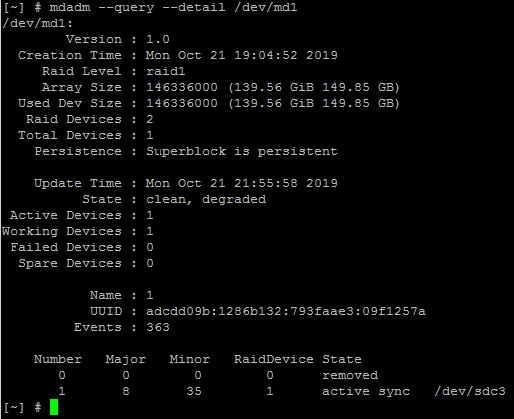
Now go to the console and using the mdadm command you can see the status and other information of the raid.
Run "mdadm --query --detail /dev/md1" where md1 is the first (and only) raid1 created on the nas.

Image

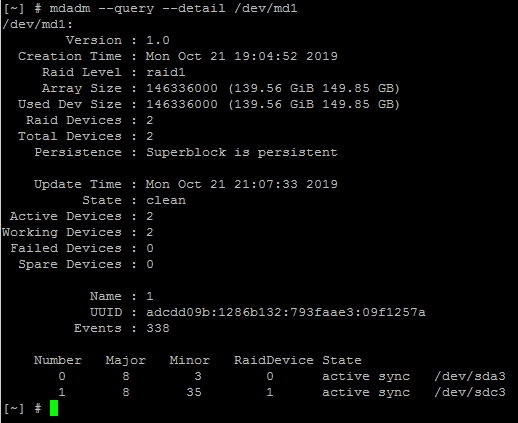
You see the correct size and status information for "clean". We also see in the lower lines the partitions involved in it.
On disk number 0 (bay 1) the partition is /dev/sda3
On disk number 1 (bay 2) the partition is the /dev/sdb3

Now we put the first disk into failure mode and extract the disk using two commands:
"mdadm /dev/md1 --fail /dev/sda3"
"mdadm /dev/md1 --remove /dev/sda3"

Image

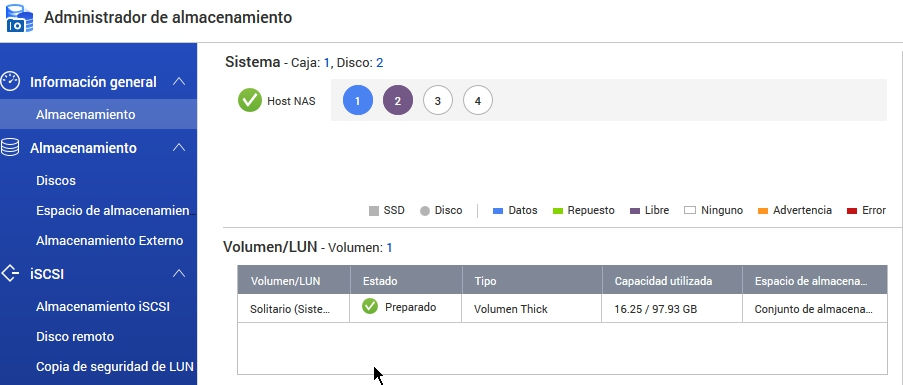
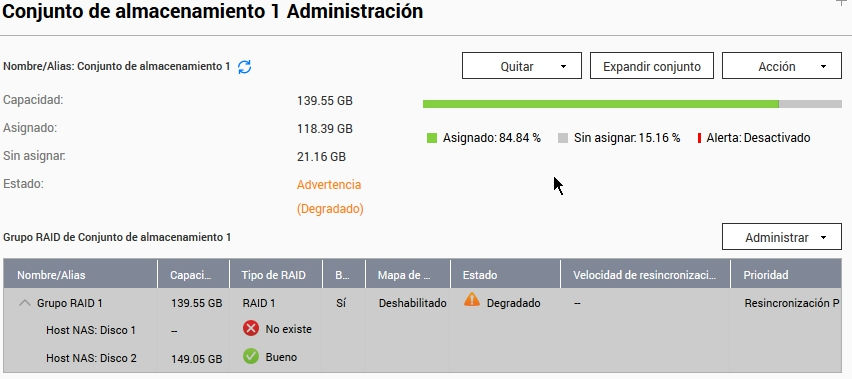
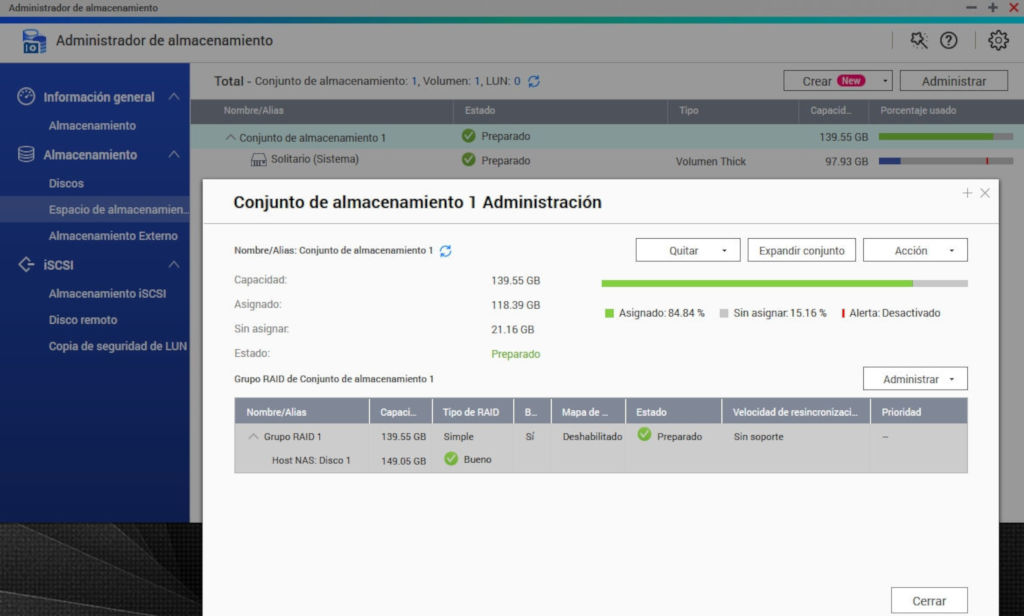
The nas will beep and activate the red alarm LED. Now we can physically extract the disk from the first bay (the original)

If we go to the QTS environment we'll see the following

Image

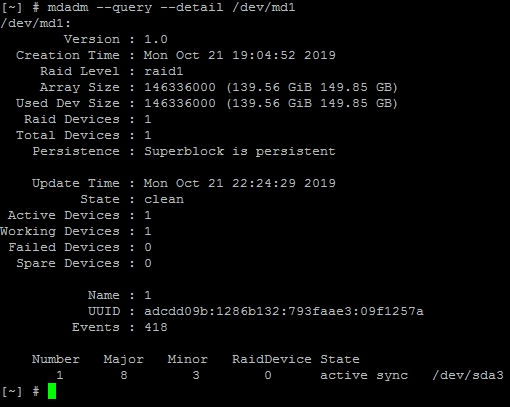
We can also see it from the console with "mdadm --query --datail /dev/md1"
Image

I run the following command by console to reduce the number of raid members to a single member. I get a single-disc Raid1
"mdadm --grow /dev/md1 --raid-devices=1 --force"
Image

Now we need to edit the /etc/config/raid.conf file to look like this:

Code: Select all

[Global]
raidBitmap = 0x2
pd_5RX0XHMS_Raid_Bitmap = 0x2

[RAID_1]
uuid = adcdd09b:1286b132:793faae3:09f1257a
id = 1
partNo = 3
aggreMember = no
readonly = no
legacy = no
version2 = yes
deviceName = /dev/md1
raidLevel = 1
internal = 1
mdBitmap = 0
chunkSize = 64
readAhead = 0
stripeCacheSize = 0
speedLimitMax = 0
speedLimitMin = 50000
data_0 = 1, 5RX0XHMS
dataBitmap = 1


[Remove]
I've removed the lines that begin with "scrubstatus, eventskipped, eventcompleted,degradedcnt".
I've removed the line that starts with "data_0", and the one that starts with "data_1" I've modified it to "data_0 = 1, disk_serial_number"
I removed the lines from the [Remove] field
I've changed chunkSize from 64 to value 0
I've changed readAhead from 4096 to value 0
I've changed databitmap from 3 to value 1

We can be done faster if you take advantage of and edit the initial file (raid.conf) when there was a single disk, we would only have to update the serial number of the disk with the new one. :wink:

Once the change is saved, we turn off the nas via QTS or from the console with "halt".

When it's off, we move the disk from Bay 2 to Bay 1 and mission accomplished. :D

We started and we already have our new record with everything we had in the original.

If we go to the QTS environment we will see the following:

Image

And if we do it by console

Image

The disk that was in Bay 1 and we removed, contains EVERYTHING, nothing has been deleted.
If we want to use it on the nas again we must delete the five partitions.

I hope it will be useful for qnap nas owners with two bays who wants to change that disk.

P.D. If you see spelling errors, clemence with me :wink:

Regards from Spain
Amazing and very useful technique, I recently got QM2-2P-344 card and will install 2TB 960 EVO on my TVS-463

I want to make this a primary drive instead of old WD-Blue 5400RPM HDD. I will try your technique next week and hope that everything goes well.

Thanks alot ganekogorta I salute you.
m_g_s_g
Starting out
Posts: 12
Joined: Thu Dec 29, 2016 4:37 pm

Re: RAID1 to single disk

Post by m_g_s_g »

ganekogorta wrote: Fri Nov 01, 2019 5:56 pm I'll try to explain how to undo a raid 1 of TWO disks to ONE only.
Sorry for necroposting. I followed with success your detailed explanations, @ganekogorta. Thank you for taking the time to document it!

DISCLAIMER: follow that procedure ONLY if you have a full backup of your NAS data.

I own a QNAP TVS-471 model with 4-bays here with firmware 5.0.0.1785. Some days ago, one of my two 6TB disks in a RAID1 mirror configuration started to show SMART ID 197 and ID 198 errors. My plan is to move to two 8TB RAID1 disks. For several practical reasons, it is best for me to first downgrade to no-raid for some days (yes, I know this is risky, but I have a full safe backup of the important information).

I document here only the differences I experienced.

1. In my case, the first line of the raid.conf file was way longer:

Code: Select all

raidBitmap = 0x00000000000000000000000000000000000000000000000000000000000000000000000000000000000000000000000000000000000000000000000000000000000000000000000000000000000000000000000000000000000000000000000000000000e
2. I had 4 disks installed (2 in RAID1 mirror, the other two just static single volumes), and therefore I had 3 [RAID_*] sections. I only touched the relevant one (RAID_0 in my case)

3. After issuing the mdadm --fail command, the NAS beeped twice. The mdadm --remove command failed in my case, but this didn't seem to affect the procedure.

Code: Select all

[/etc/config] # mdadm /dev/md1 --fail /dev/sda3
mdadm: set /dev/sda3 faulty in /dev/md1
[/etc/config] # mdadm /dev/md1 --remove /dev/sda3
mdadm: hot remove failed for /dev/sda3: No such device or address
4. Under the [Remove] section I just had one line. I deleted that line (leaving just the [Remove] header) before powering up the unit without the failing disk:

Code: Select all

[Remove]
0x00000001 = 0x2
5. This procedure could eventually work as well just to swap disks in slots. I didn't try that here, but plan to do that once I move to a 2x8TB RAID1 group. I'd prefer to keep the 2 mirrored disks in adjacent slots.

Of course, none of the actions above are supported by QNAP, "do at your own risk".
m_g_s_g
Starting out
Posts: 12
Joined: Thu Dec 29, 2016 4:37 pm

Re: RAID1 to single disk

Post by m_g_s_g »

5. This procedure could eventually work as well just to swap disks in slots. I didn't try that here, but plan to do that once I move to a 2x8TB RAID1 group. I'd prefer to keep the 2 mirrored disks in adjacent slots.
Well, I was able to complete the move. It was very easy to swap disks in slots. I just changed this lines in the aforementioned /etc/config/raid.conf file to move a disk from (bothering) slot 2 to slot 4 (before shutting down the NAS, swapping the disks and restarting the NAS), to leave space for a new disk in slot 2 (of course, leave your disk id 50014E11111119D2 as is):

Code: Select all

data_0 = 2, 50014E11111119D2
to:

Code: Select all

data_0 = 4, 50014E11111119D2
That way I've been able to re-create the RAID1 mirror, this time with 8TB disks and in slots 1 and 2. Note that this was with my RAID1 System disk.

The procedure to convert a single static disk in slot 1 to a RAID1/mirror (slots 1 + 2) is well documented elsewhere.

Of course, none of the actions above are supported by QNAP, "do at your own risk".
Post Reply

Return to “System & Disk Volume Management”